I’m a new python developer and upon doing some research i stumbled across this python project called Sanic. Now i’m no pro but what i really like about Sanic is the ease of use, the active development, and being flask like makes it a little familiar to existing flask users. Also the support of Python 3.5+ is great because of the support for the new async/await functions, which greatly increases the speed of requests that can be processed in a project. Now i’m sure that i’m not utilizing it to its full potential currently, i do plan to learn to do this in future projects which will all be posted here.
In this multi-part tutorial we will go over the basic setup of a Ubuntu server, getting our software installed and configured, and finally getting our project setup and running and ready for you to go on and create with. We will also be using this as a base for our future tutorials in Sanic and Python web-services.
Contents:
- (Part 1 (You Are Here)) Initial Ubuntu 16.04 Server Setup
- Getting Started
- SSH-Key Authentication Setup
- Finishing Up
- (Part 2) Web Stack Install and Configuration
- Linux
- Nginx
- MySQL
- PHP
- Finishing Up
- (Part 3) Python Environment Setup
- Installing Software
- Setting Up the VirtEnv
- Finishing Up
- (Part 4) Sanic Project Setup
- Getting Files Setup
- Setting Up Project Defaults
- Running Our Project
- Where to go from here?
First things first we are going to need a server to use, these are relatively inexpensive now days and can be procured by the average computer user with little experience. I personally choose to use DigitalOcean (Referral Code – Free $10 Credit) due to its ease of use control panel and user friendly setup of new droplets. I’m sure Linode, Amazon AWS, or Microsoft Azure will work out just fine as well but i haven’t used any of these so don’t have any advice nor experience on using these providers.
When choosing a location you should choose to host close to where you want your content to be viewed mainly, we wouldn’t recommend a server in Norway for content to be mainly viewed in Brazil.
Getting Started with Ubuntu
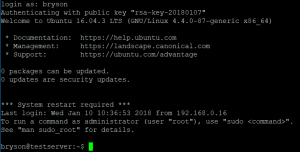
So we have our server now and are looking to get this baby ready for some actual use. We will need to start with a bit of up-keep to ensure everything is up to date and ready to go.
Start by issuing our update to the server to make sure all our packages are updated:
sudo apt-get update && sudo apt-get dist-upgrade
Next we need get our new user account created and ready so we no longer have to login with the root account. If your using a provider that auto provisions a user (eg. not root) then you can skip this step or you can continue to follow along to add a new user with a ssh-key based login.
This command makes our new user account:
adduser bryson
Now this will create our new user and get everything setup for us to continue on. You will be asked a few questions here which should be easy to answer, one of which will be the password for the user.
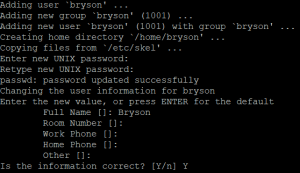
We should add the sudo group privileges to our new account so we don’t get cause without permissions later on when we need them:
usermod -aG sudo bryson
Next up we are going to setup the public key authentication for the newly created user. This will allow us to secure our user account against unauthorized access on this public facing server.
SSH Key Authentication
(I highly recommend doing this step on all initial setups, though it is not required to actually finish this tutorial.)
There is a few ways to do this depending on the type of operating system you use on your local computer. i will include each below so you don’t have to go searching yourself, after all this is a tutorial you shouldn’t need to go search when following along.
Windows:
We will need a small program called puttygen (x32 / x64 / Putty (External Link) )
Once we have this program running we can go ahead and get our keys generated and ready for use to use. You should see something similar to the following:
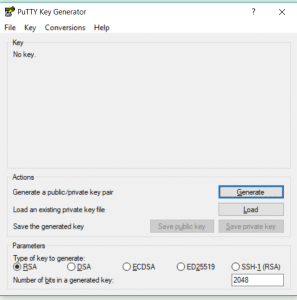
We’re going to leave the default settings for type of key, but we will go ahead and change the value of bits to 4096 for a bit more security and piece of mind. Go ahead and click generate and you should be presented with the following:
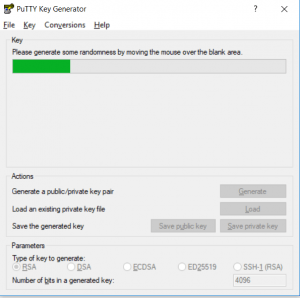
Continue moving your mouse around in the area to get the “randomness” setup in order for the application to generate our keys. This process when finished may take a minute or could be a bit longer on older computers to generate the keys, just stand by until it does finish and you’ll be presented with this screen
Do note here this key will not be used but you should always keep your keys secure and accessible to only authorized users. I would suggest a encrypted usb drive to ensure you have access only when required.
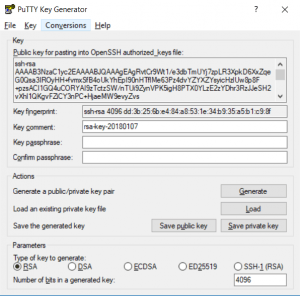
Finally we can save our keys to our local disk and be ready to finish our users setup. Click each save button and name the file, in this instance we will use whitedog.pub and whitedog.ppk. You can opt to save the private key with a passphrase (recommended) by filling both the fields. From here we have what we need, don’t close this quite yet as we will be using the OpenSSH authorized_keys section in the next part of this tutorial series.
Linux & Mac OS X:
Simple and sweet, from the terminal run the following command and enter the details as asked.
ssh-keygen -t rsa -b 4096
This will result in something similar to the following with path being the difference on linux vs mac os:
Generating public/private rsa key pair.
Enter file in which to save the key (/home/bryson/.ssh/id_rsa):
Created directory '/home/bryson/.ssh'.
Enter passphrase (empty for no passphrase):
Enter same passphrase again:
Your identification has been saved in /home/bryson/.ssh/id_rsa.
Your public key has been saved in /home/bryson/.ssh/id_rsa.pub.
The key fingerprint is:
SHA256:y/ANFtifhWCAxfe92whIrPTVgni1SRd5GWiBkiXDoEw lilfade@testserver
The key's randomart image is:
+---[RSA 4096]----+
| E+++=o..o=.o |
| o...+=++.= o |
| o .+o*.B.. |
| o =o*oo |
| ..=Soo. . |
| .=o+. . |
| + .. + |
| o . |
| |
+----[SHA256]-----+
Finally from here we will add this newly generated key and create or append to our authorized_keys file. There is a few ways to do this and i will quickly highlight them so you can best use the one for you and your setup.
Moving / Adding our new Key:
ssh-copy-id
Using ssh-copy-id can be easy as it does everything automatically, this is done by executing the following command on the terminal and entering your password. You may need to change paths depending on linux or mac os base ssh-copy-id -i ~/.ssh/id_rsa.pub username@123.45.67.89.
Manual
The next method is copying the key manually, as the existing root user you can login to the new user by issuing this command su - bryson. Once logged in we will create the new folder to hold our authorized_keys file: mkdir -p /home/bryson/.ssh. Now that we have this setup lets go ahead and set the permissions to lock this down from prying eyes, chmod 700 ~/.ssh.
We can finally create and open our authorized_keys file and add our public key, nano ~/.ssh/authorized_keys. We will want to paste in our public key string and save this file, if you need a reference to which string you need you can find this below in our post reference. Finally we want to restrict the permissions on this file by issuing this command: chmod 600 ~/.ssh/authorized_keys.
Making Sure All is Well
Now that we have our user ready for key based authentication, we just need to test and make sure all is well before we lock ourselves out when turning off password authentication. Start by logging into the server terminal with the new private key file. If all goes well we can go ahead and disable password based authentication.
By navigating to our sshd config file (nano /etc/ssh/sshd_config) we can finally disable the setting, look for PasswordAuthentication yes and change it to no. Save and exit from this file ( ctrl + o & ctrl + x). We need to make sure our ssh config file is reloaded so we need to run this command: systemctl reload sshd. Now we just need to ensure we can still login and if all is well, we successfully have our new user setup and secure and ready to run our software and projects.
Finishing Up
This concludes the part for our basic server setup, worry not the post was getting too long and we decided to cut it here and continue in the next parts of this tutorial. Hopefully you enjoyed this part of the tutorial and cant wait for you to read the rest and see what you create from the end product.
Post References
authorized_keys file
ssh-rsa AAAAB3NzaC1yc2EAAAABJQAAAgEAgRvtCr9Wt1/e3dbTmUYj7zpLR3XpkD6XxZqeG0Qsa3IROyHH+fvmxSfB4oUkYhEpI90nHTflMe63Pz4dvYZYXZYsyicHzlUw8p8F+pzsACI1GQ4uCORYAI9zTctzSW/nTUi9ZynVPK5igH8PTX0YLzE2zYDhr3RzJJeSH2vXhl1QKgvFZiCY3nPC+HjaeMW9evyZvs+14l9LC2Y9F9EuzgXRJo4gDhsf46PP1sGcIAWPYvZXpihwlp/IbIXZBczrsDIpfrgfcfpEp9WkqwC66fGpmu8/vXNPjdjRS+E08p9oa5dXSXKeWu371kDphMkBxC7b3OeR1qy/hoX7XYAijgVEzCh76e5yAkilavIaxoq2si8aBBWa76rczFbZYiD/tHOi5U7VilFxIoPxjQOXk4sEeal4YSvqZ/T6eLomYn6JAqTDcFb5kmnrjnKlvfiYpbDzsjsdimQv9LC6HFVrlihZGwaN1TblWcC661wU1JiEauCP/QE0f/IfTuiBcaiMNotk6EmH/OXaYMfvpqNTvtKHN5MCcjW7wIe0ZLuq0c0NKQK9KPmpzGbwBqyb4GatxFxW9PpFTf7RlbsnaCVQ61fDHZV+mnz9+Vcn5YagOORG62qaQPKLyvChU5xt4ZKGV1CdhbqzLV5VQEiKdtHWy0c6OGRW9XMLRVG3YZbituE= rsa-key-20180107whitedog.pub
---- BEGIN SSH2 PUBLIC KEY ----
Comment: "rsa-key-20180107"
AAAAB3NzaC1yc2EAAAABJQAAAgEAgRvtCr9Wt1/e3dbTmUYj7zpLR3XpkD6XxZqe
G0Qsa3IROyHH+fvmxSfB4oUkYhEpI90nHTflMe63Pz4dvYZYXZYsyicHzlUw8p8F
+pzsACI1GQ4uCORYAI9zTctzSW/nTUi9ZynVPK5igH8PTX0YLzE2zYDhr3RzJJeS
H2vXhl1QKgvFZiCY3nPC+HjaeMW9evyZvs+14l9LC2Y9F9EuzgXRJo4gDhsf46PP
1sGcIAWPYvZXpihwlp/IbIXZBczrsDIpfrgfcfpEp9WkqwC66fGpmu8/vXNPjdjR
S+E08p9oa5dXSXKeWu371kDphMkBxC7b3OeR1qy/hoX7XYAijgVEzCh76e5yAkil
avIaxoq2si8aBBWa76rczFbZYiD/tHOi5U7VilFxIoPxjQOXk4sEeal4YSvqZ/T6
eLomYn6JAqTDcFb5kmnrjnKlvfiYpbDzsjsdimQv9LC6HFVrlihZGwaN1TblWcC6
61wU1JiEauCP/QE0f/IfTuiBcaiMNotk6EmH/OXaYMfvpqNTvtKHN5MCcjW7wIe0
ZLuq0c0NKQK9KPmpzGbwBqyb4GatxFxW9PpFTf7RlbsnaCVQ61fDHZV+mnz9+Vcn
5YagOORG62qaQPKLyvChU5xt4ZKGV1CdhbqzLV5VQEiKdtHWy0c6OGRW9XMLRVG3
YZbituE=
---- END SSH2 PUBLIC KEY ----
Fingerprint: ssh-rsa 4096 dd:3b:25:6b:e4:84:a8:53:1e:34:b9:35:a5:b1:c9:8f