Hi and welcome to what has since turned into a extremely long blog post. I initially thought this post would be a great starter and also thought it would take no time at all, I was wrong. This post turned into quite the unwieldy beast, and boy did it take me quite a bit of time. As i moved from piece to piece and got it all out and working, i noticed some subtle changes i needed to make, and a couple large mistakes or omissions i made along the way. So I welcome you to a complete and utter step-by-step hand holding tutorial on how to start from scratch creating a web server. I will guide you on how to install and setup required software to get the server in the shape it needs to be in to host our projects or pages. And finally we will do some configuration changes, and then test everything to ensure it all jives together and works correctly.
Update 11/18/2018: This post has had a few edits in order for it to be up to date with the few changes that needed to be made.
This tutorial will assume a few small things about your skills (listed below), but not to worry we have very detailed instructions and images from start to finish to help guide you along.
Assumptions:
- You know how to use your mouse and keyboard effectively
- You have a virtual machine, bare metal server, or equivalent
( If not: DigitalOcean (Referral Code – Free $10 Credit ) - A basic understanding of computer related terms, though recommended not required
Before we get officially started we’ll go over a few notes about this tutorial, which should help you understand the differences between code, comments, and specific changes you will need to make going forward.
Notes:
- I make use of DigitalOcean in this blog post, all links to the site will be affiliate links in which we would both earn a credit. if you are against this, then you can click here for a non-affiliate link.
- I could be wrong while explaining things, i’m a person after all. Just hit that comment box at the bottom and let me know why you think i’m wrong and what we should fix.
- If you have general questions, feel free to contact me and we can try to help you out. Do note, we only provide advice and you should take the time to research the advice given if you feel it is in error.
This is code that can be copied– when you see this it is a text block or command that can be copied to your terminalThis needs to be edited, but still code– this shows when a code or text block needs to be edited by you for your setup, change only what’s in red- Lastly, as we move along I will expect you to remember what you have learned. I’m referring to how to open and close files, moving around in the terminal, restarting the server software ect. I do this specifically to encourage you to learn a bit more and help things stick while your learning.
And with that we’re ready to start. From this point on you i recommend you follow the different sections in order to have the same setup i describe in this tutorial. If you are here to try and figure out why something is not working, you can just jump to the relevant section or hit that comment box at the bottom of the post for a more personalized answer to your question.
{Table Of Contents}
- DigitalOcean Setup
- SSH Key Generation
- Putty and Winscp
- Tips and Tricks
- Ubuntu Server Setup
- Updating The Server
- SSH-Key Authentication Setup
- Web Server Setup
- Installing Nginx
- Installing MySql
- Installing PHP
- Installing Let’s Encrypt
- Installing Nginx
- Domain Setup
- Configuration Setup
- Configuring Nginx/PHP
- Obtaining SSL Certificates
- Finishing Nginx Setup
- Configuring Nginx/PHP
- MySQL QuickStart
- Manual
- GUI Assisted (HeidiSQL)
- Where to go from here?
{DigitalOcean Setup}
First things first we are going to need a server to use, these are relatively inexpensive now days and can be procured by the average computer user with little experience. I recommend using DigitalOcean (Referral Code – Free $10 Credit) due to its ease of use control panel and user friendly setup of new droplets. They include a cloud based firewall that is amazingly easy to use, not to mention the other various services and tools they have. I’m sure Linode, Amazon AWS, or Microsoft Azure, or the cheaper shared hosting providers will work out just fine as well but i haven’t used any of these so don’t have any advice nor experience on using these providers. If I do get the chance to use them I will update this post to include information for them, but we will be using DigitalOcean’s services for this tutorial.
Before we get started there is a few things you should know:
- When choosing a location you should choose to host close to where you want your content to be viewed mainly, we wouldn’t recommend a server in Norway for content to be mainly viewed in Brazil. When a user makes a request to your site, they will have a delay in loading the site contents based on the region they live in compared to where your site is hosted.
- You also want to make sure that the content you host on the site is legal in that particular region as well.
- Most providers will give you an ip address to use when connecting to your server, you also use this for your dns to direct your domain to your servers location. Your details for login should be setup when you initially create your droplet, if your not sure what this means, don’t worry like i said this is a step-by-step tutorial.
First visit DigitalOcean and get signed up, it’s really easy and only takes a few seconds. Best of all if you use the link from this page you get $10 in free credit right after setting up your account. When you arrive at the signup page you will need your email address and a nice secure password.
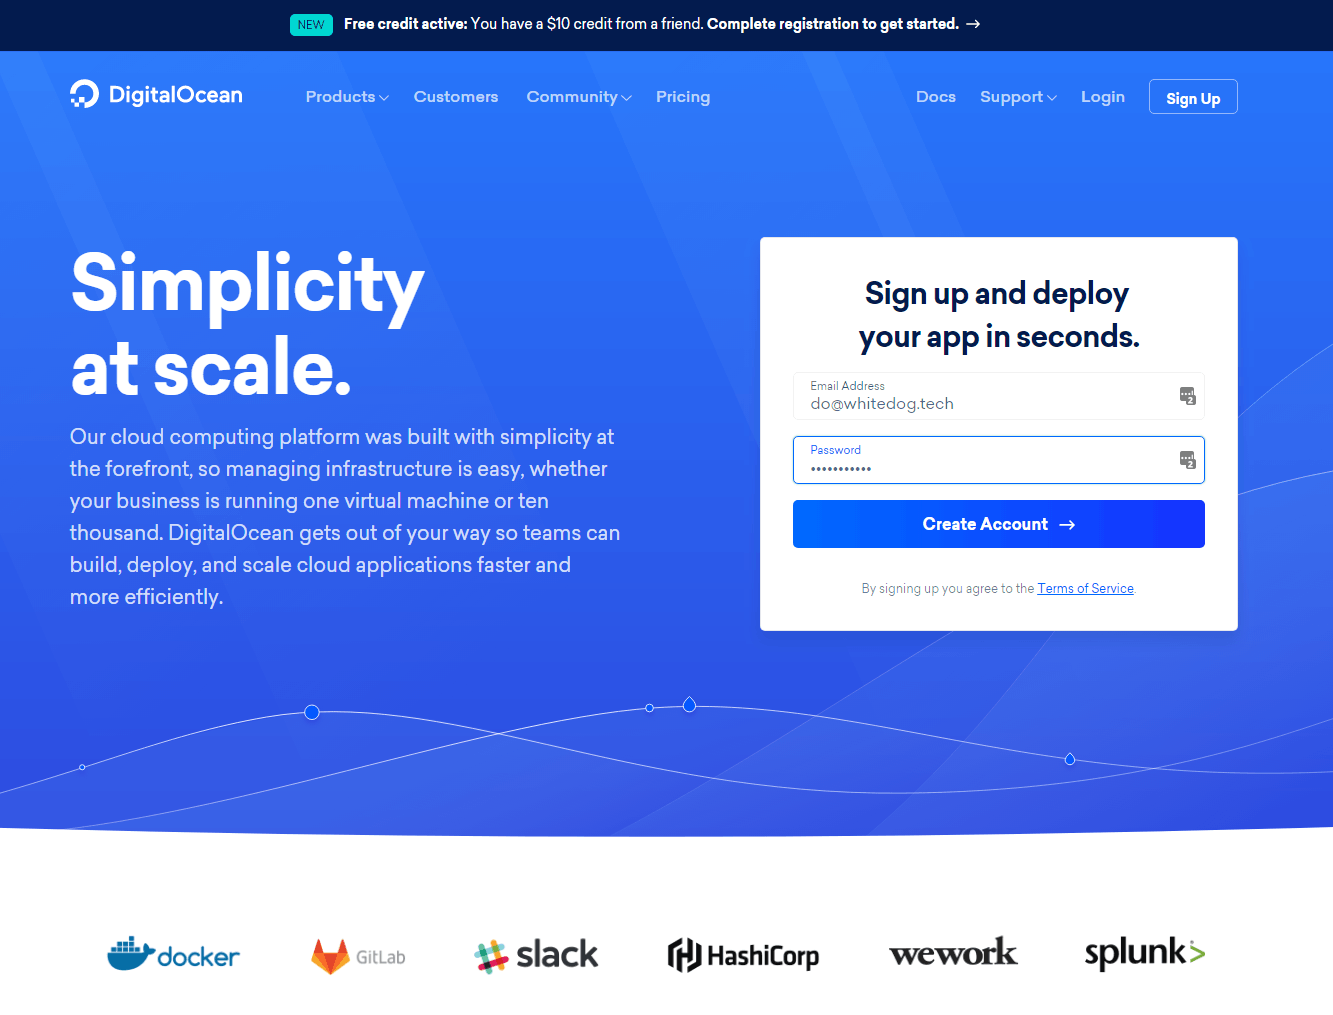
Quick and easy sign up for your account!
Now, you will have to swap over to your email and click the link to activate the account you just created
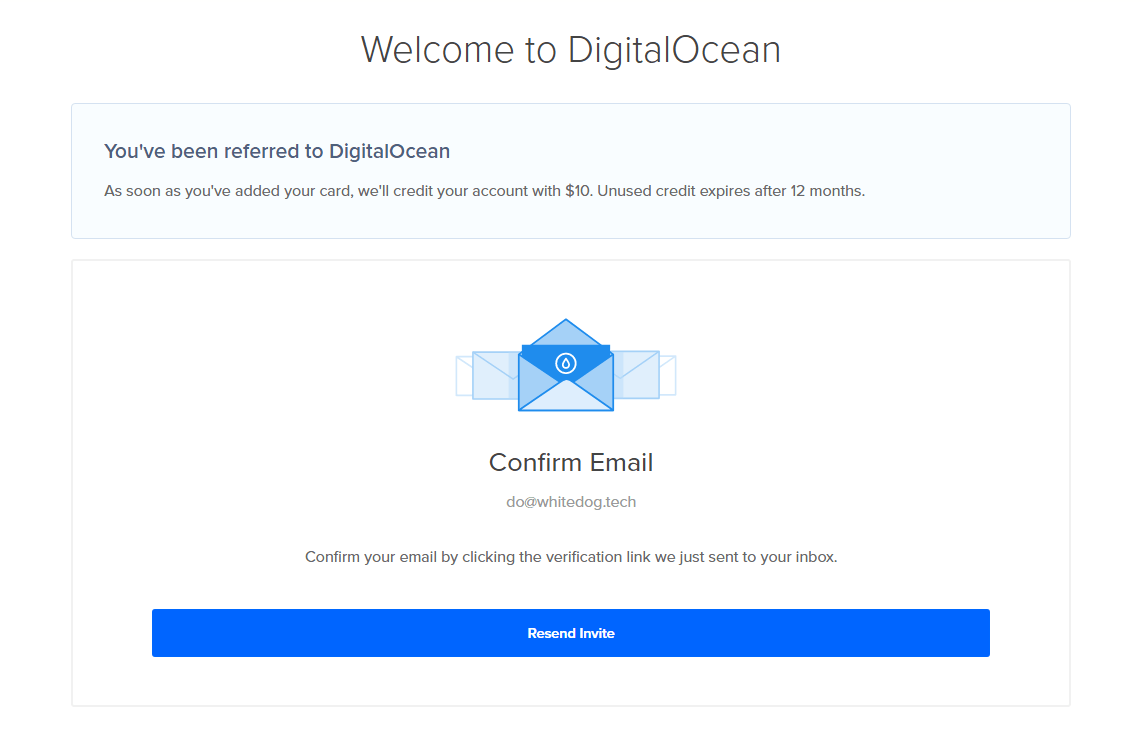
Super easy, just like i told ya!
And finally we’re on to the billing page. This is just as simple and after this you are set and should have your free $10 in credit (provided you signed up with the affiliate link above).
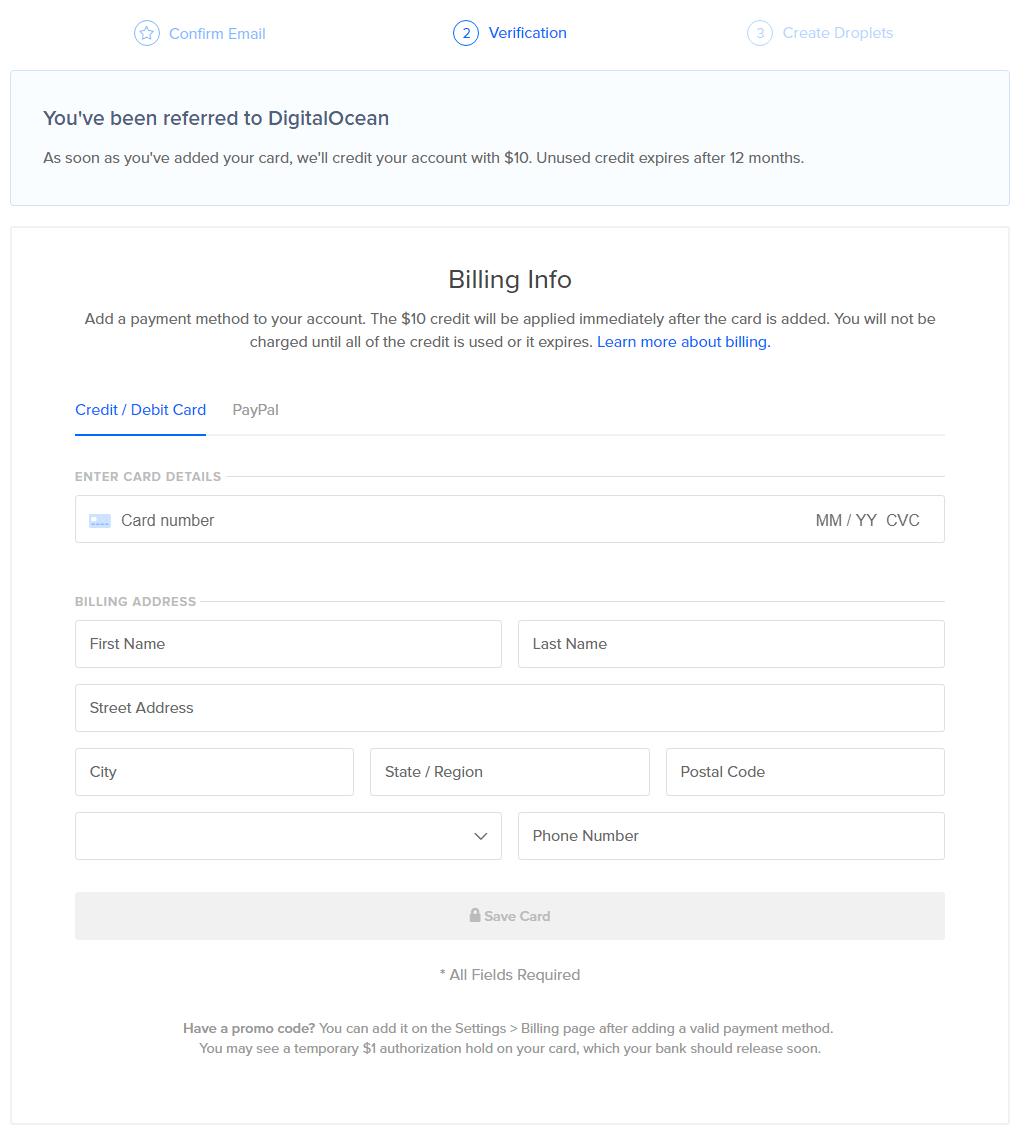
Last step in the sign up process, after this we can start to get our hands dirty!
Now we’re almost ready to get our hands dirty, we just need to create a droplet for our site or project to run on. You should see something that looks a little like the following.
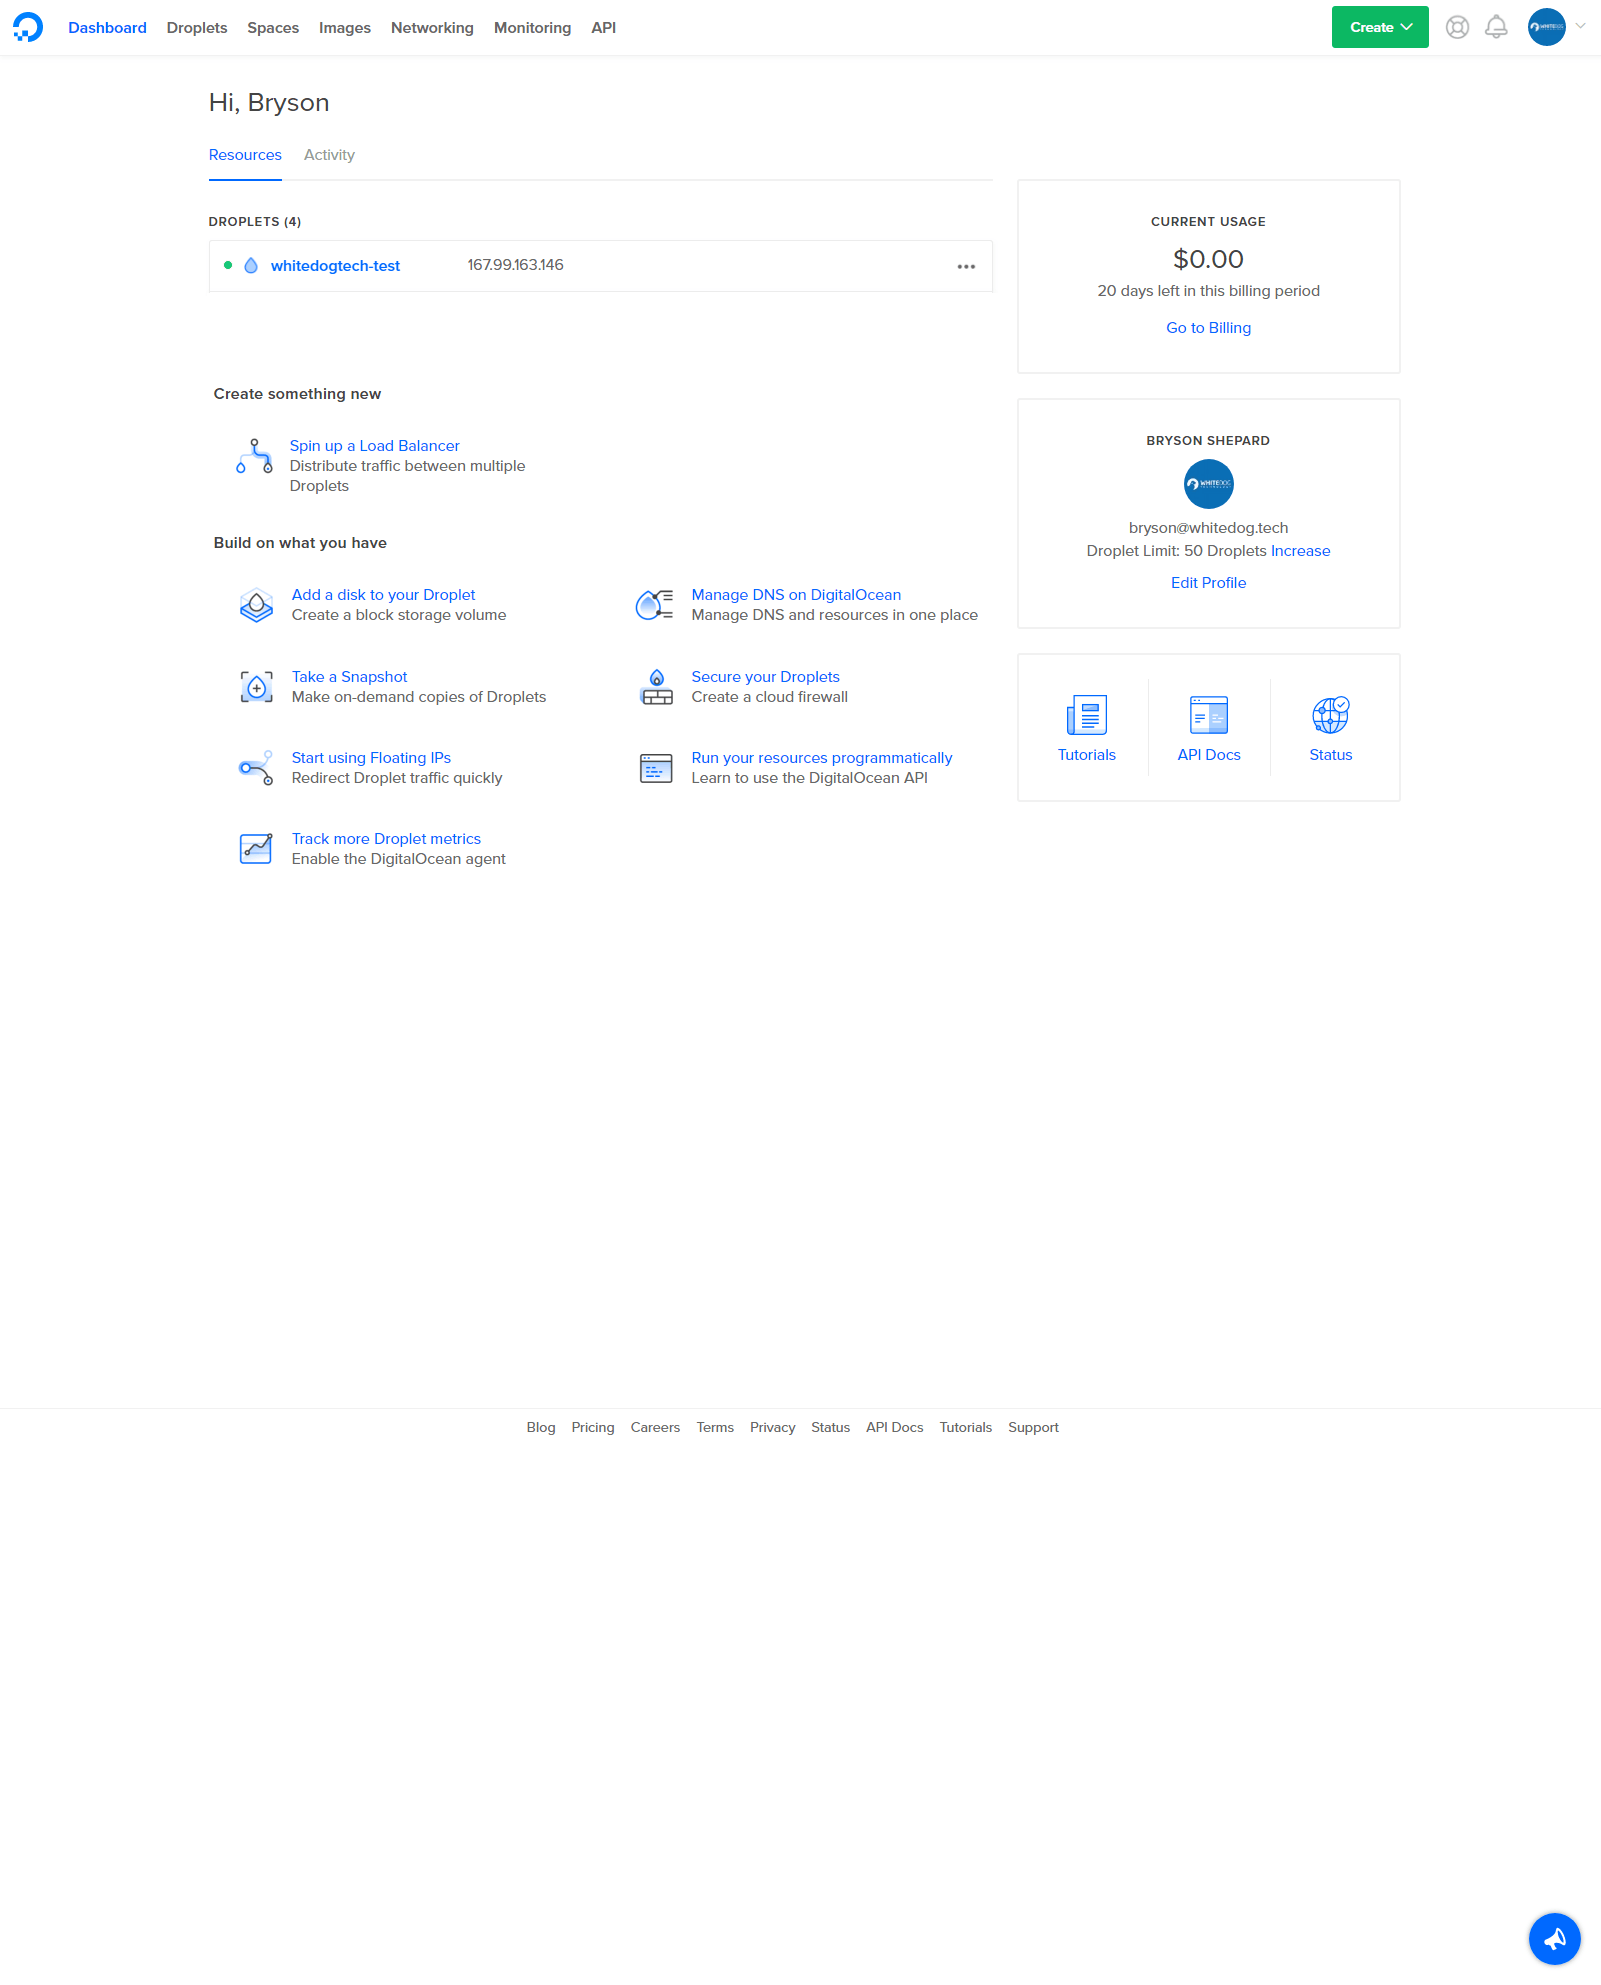
Dashboard of DigitalOcean, nice user friendly layout.
{SSH Key Generation}
Now, we need to do a bit of preparation before jumping into our first droplet. We will be creating an ssh-key to login and manage our servers. When creating a droplet you should always add a ssh-key to the initial setup to ensure only authorized people can login. You can do this when setting up your first droplet, but you need to know how to make the key first. This will be a straightforward process and after doing it once or twice you will get the hang of it. Word to the wise, don’t always use the same ssh-key on each machine to better protect the security of your droplets as we have done in this tutorial for both users.
We will be using putty and it’s tools to run through this tutorial. First start by visiting the following site and download the package files: https://www.chiark.greenend.org.uk/~sgtatham/putty/latest.html (Direct: x32 | x64) and once downloaded go ahead and install it. This program is a tool we can use to generate keys and also allows us to manage our server via the terminal once we have it up and running. If your iffy about the programs you download to your computer you don’t have to worry about these or any posted in this tutorial, you will need at the very least Putty and PuttyGen. You will also need Plink.exe if you plan to use HeidiSQL later on, this is not required and I will show you how to manage the mysql via command line as well. As an alternative for putty you can also look into winscp, which will allow you to have a more “FTP Client” feel to connecting to your server but for now we will stick to putty and its components. Winscp is really worth a look once you feel a bit more comfortable on the command line and want to work a bit faster while transfering files.
Once installed go ahead and open puttygen, you can do this easily by using the windows start menu search bar. Once opened you will be presented with the following screen
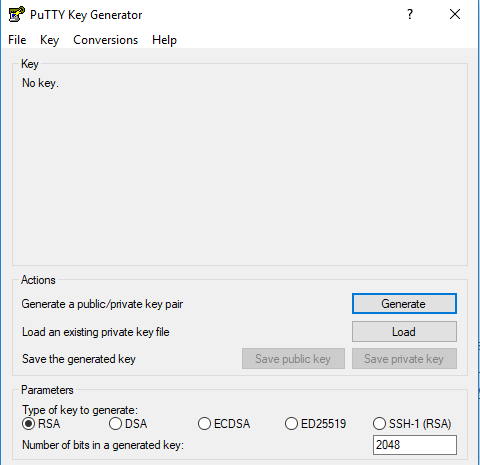
The home screen of puttyGen
From here you will generate the key, this is pretty easy to do first start off by editing the bit for the generated key to 4096. This is going to increase the security of the key and give us just a bit more piece of mind. Once you’ve done that click “Generate”, this will lead to you having to move your mouse around inside the box randomly until the bar fills up. Once complete it will generate the key and allow you to save it in various formats.
Now that the key is made go ahead and give this key a comment and passphrase before continuing along. I personally recommend using words in my passphrase rather then a simple password, eg. “The Green Cat Got A Bath” but feel free to make them as you see fit. Always take care you remember your passphrase you will need it to login every time, as forgetting could mean not being able to connect to your servers!
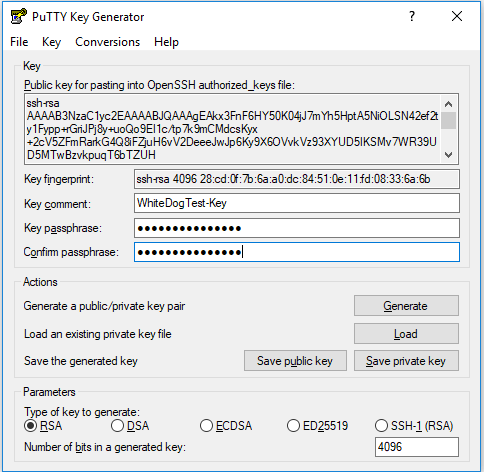
This is how it looks once the key file has been generated
Now that you have come up with a nice comment to help you remember what this key is for and an awesome passphrase to keep our key super secret, we can now save it. Click the save public key button and go ahead and save this file to a secure folder on your computer or flash drive. We’ll call this one “WhiteDogTest.pub” and save it in our “super secret folder”. Next click the button to save our private key, now this baby is our key to our server. When you connect and it asks “who is it” you flash this bad boy and your in the VIP spot… pending you also have the passphrase for this specific key. We’re going to save this one as “WhiteDogTest.ppk”. Awesome, you’re almost done with puttygen, just for the sake of pulling our hair out later, we’re going to copy the public key for OpenSSH into a notepad document and save that along with our files, we will be needing this here in a bit.
It should look like the following, make sure to copy the whole thing from ssh-rsa to the end of your comment:
ssh-rsa AAAAB3NzaC1yc2EAAAABJQAAAgEAkx3FnF6HY50K04jJ7mYh5HptA5NiOLSN42ef2ty1Fypp+rGriJPj8y+uoQo9EI1c/tp7k9mCMdcsKyx+2cV5ZFmRarkG4Q8iFZjuH6vV2DeeeJwJp6Ky9X6OVvkVz93XYUD5IKSMv7WR39UD5MTwBzvkpuqT6bTZUH+kGcXrl3ZFLSDdlxQz2t17L1/feQQAfvewNwMv2QLJYVFscVVxhBhObjNRScxszvQUqjAAEY09FZbpvvsMEyYBdrRhCAwHGatVm5W5tolH82kTtLcTize7dWNifxH/kEuHkQH+XmsRDpprevkcPC8JppQk8xVNggNYORdGxpXwoBR8zvFpXztzKXDoe0P4yVO5is64qReWXJ/5ZHRQPf9gDFGXfYUateldAI8bwmGhpfMBZPiwbvpes1ujP6tSnjwkPjlbKbAU08q6452vlbrXQvy8FPBa1VMIV/Zr6ephyyK0pyZcrNPFfW1F80BLwktYIWX4jeMD2rD112g/6uJDadg9yUgIDWDM2jNX0uTAa0so1jkyrXoLhTladD8Oe4h3T0z2aTSIgqfpeoMIcrOmGMu0dsApfO3I1F65knSpRJ979n+LaNzZRZctZ0h7JTaOdDAkMtSW9oWYWujQmR1mYWGtj2UpNbKYanbRC6liHCPKzVVjllDwbHqW2MU/T3r0l4rcSiM= WhiteDogTest-Key
Now we’re finally ready to make our first droplet, im sure if at this point you have decided to go toward another host you can use the same key made above to enable login via the key file you created above. If you have issues, feel free to leave a comment below and i can try to help you through it. Do note that some hosts will create the initial key for you and the username to login could be root or ubuntu. Onwards.
Start by clicking that awesome green button in the upper right corner of the screen, select “Droplets”. On this page we will choose what type of machine we would like created for us. For this tutorial we will choose a Ubuntu 16.04.4 x64 machine (current lts release, though this will change very soon but will still be good to use for now) and the rest of the settings you can nab from the following image to save us both a bit of time. Basically this is the size, region, and any extras we want, this setup i have will be based in the SFO2 datacenter with the minimal size which is great for a starting site and finally the monitoring option which is free and useful.
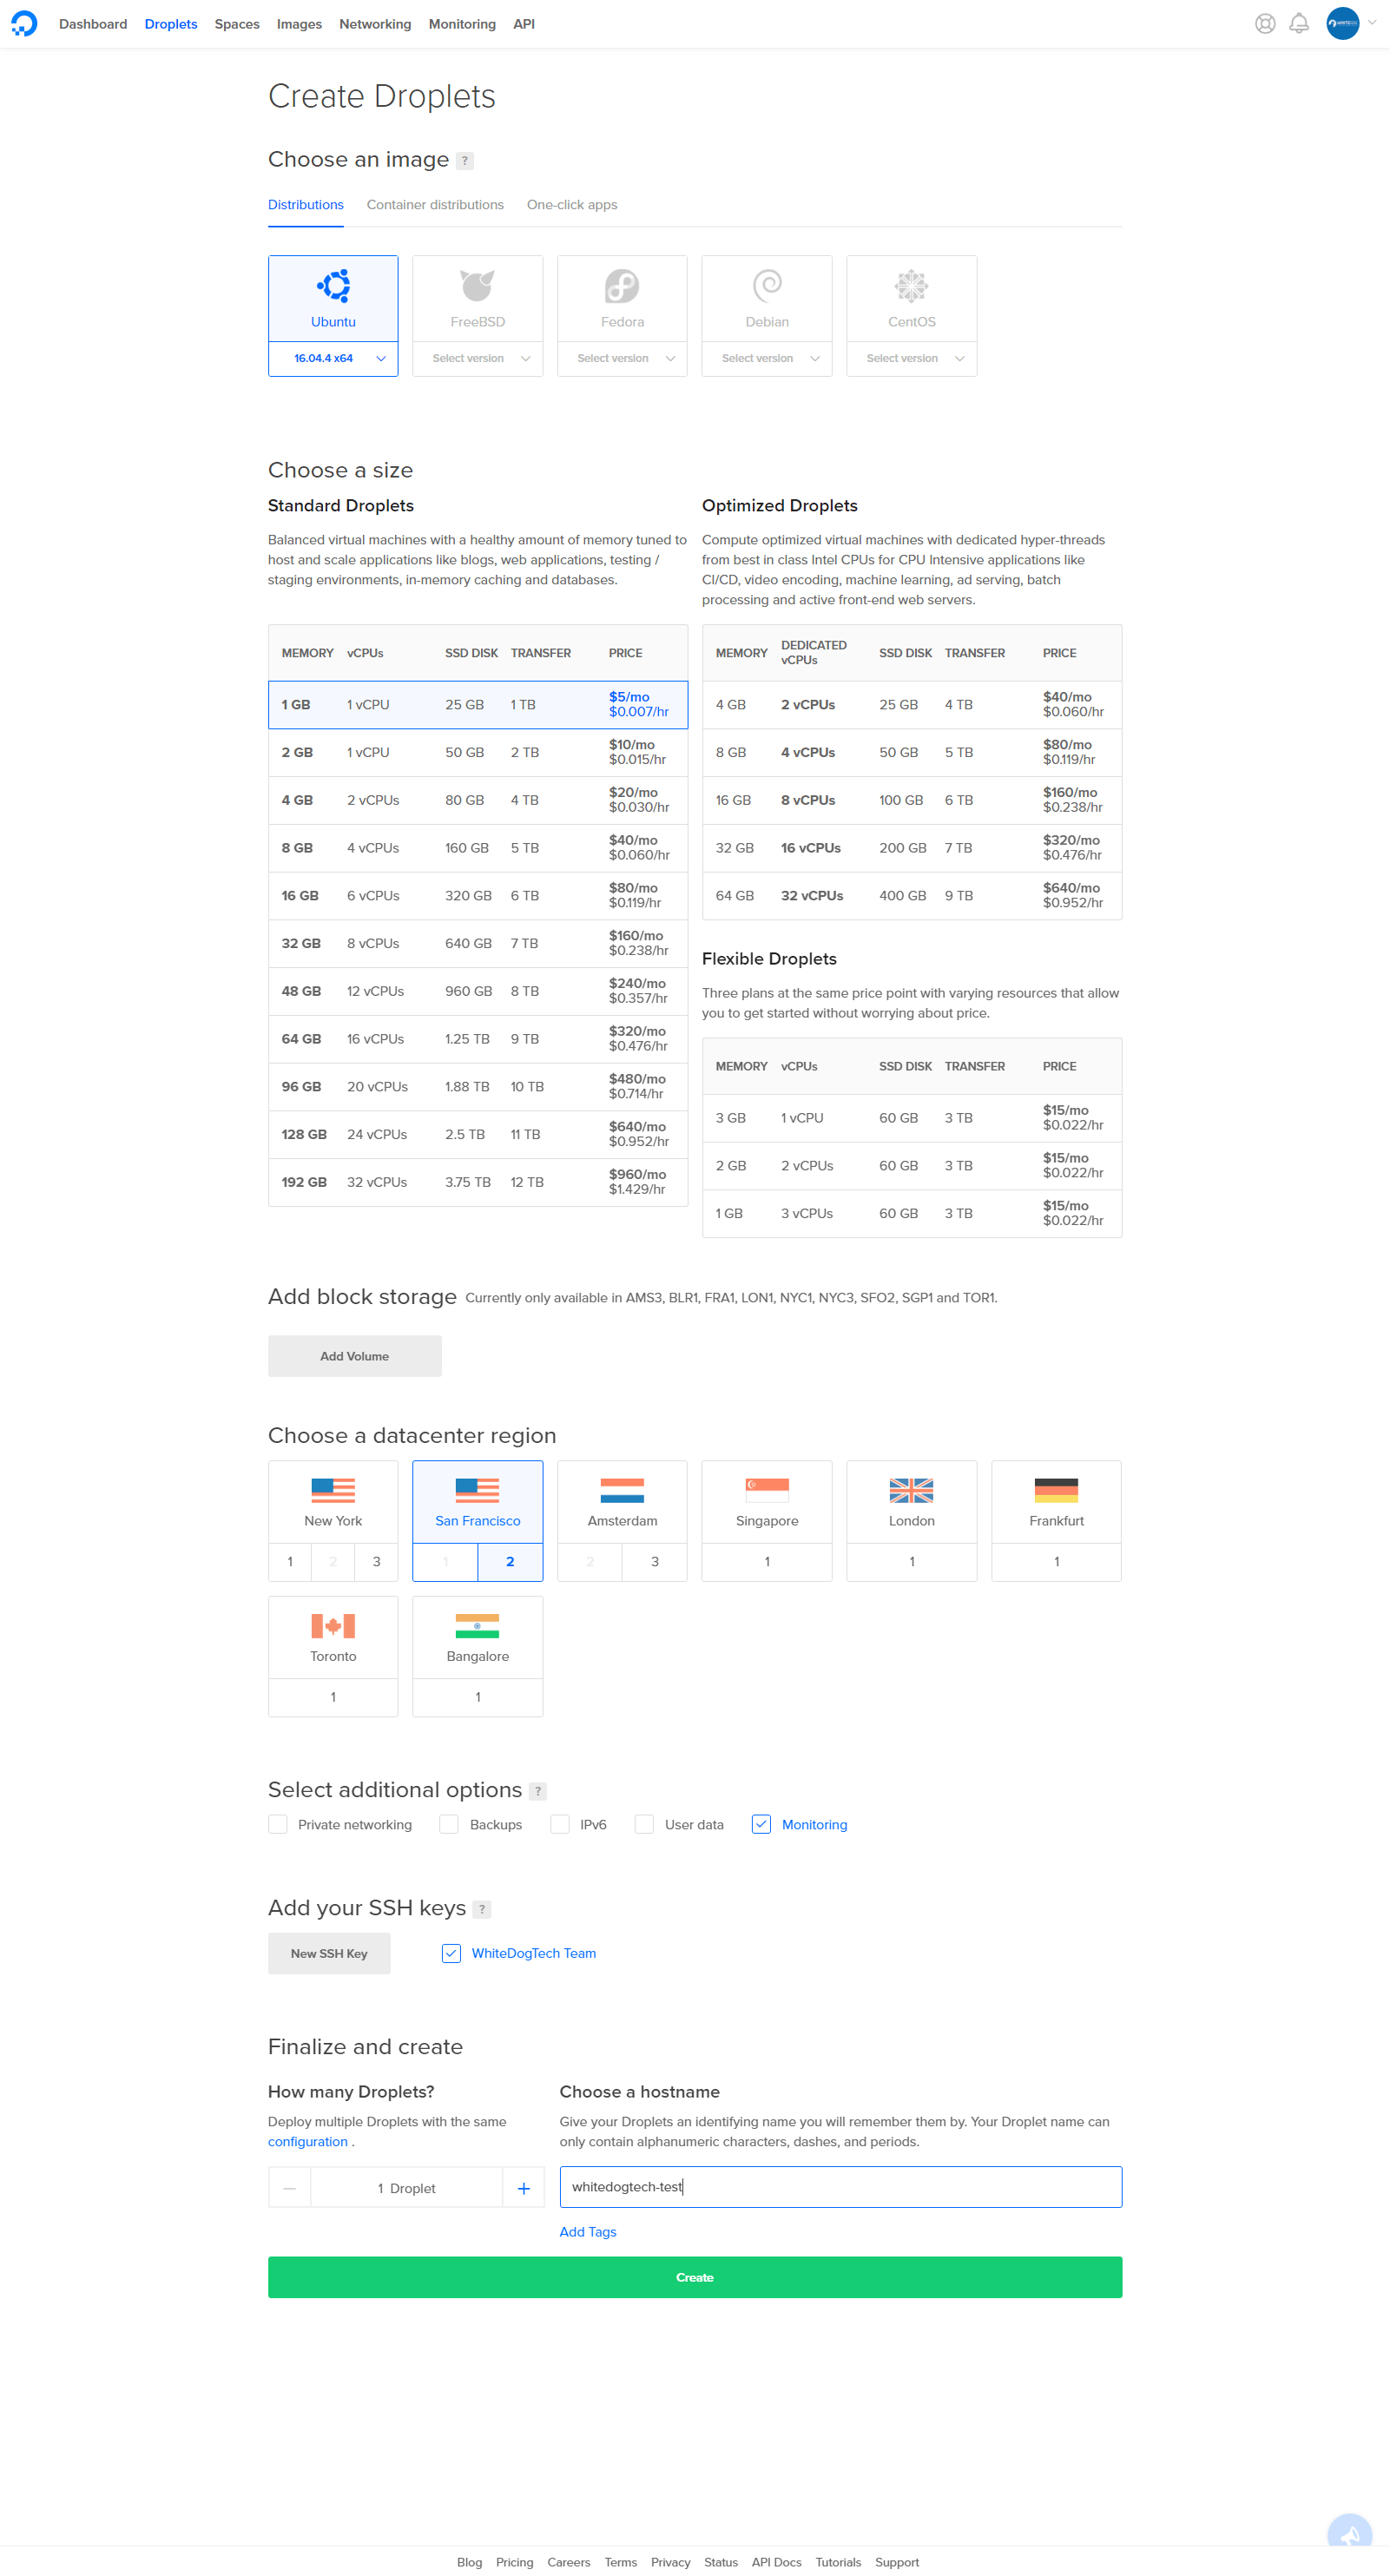
I’m huge, click me for the full image
Before you click Create, check out that section for “Add your SSH keys”. I bet you can guess where i’m going with this, yep go ahead and click that button labeled “New SSH Key” and paste in that long string we saved from our key generation before. Add a name so we know which key is which, this one will be “WhiteDog Test Key” and click add. Now finally we will want to name our droplet, if you are using a single domain on this server the recommended hostname would be: yourdomain.tld. If you plan on hosting multiple sites then feel free to use a descriptive name here to help you tell the differences between your droplets. Once finished click create, this should only take about a minute at most usually, pretty awesome right?
And you have now created a ssh-key (hopefully with a secure passphrase) and setup your first droplet, Congratulations! Now it’s time to roll up our sleeves and get our hands dirty with a bit of ol’ console commands, don’t worry i got your back if you get lost. Just keep thinking step-by-step, this is tried and tested by a non techie, so i’m sure you can do this!
{Ubuntu Server Setup}
Okay on a serious note, going forward we will start using some linux commands and I will try to explain what we are doing along the way. Some commands may escape you and you may just want to say screw it, or think you completely messed up, but good thing is unless you are running delete commands (which we won’t in this tutorial) you probably didn’t mess up. And now back to our tutorial and getting logged into our new server. First off, fire up that other application we downloaded earlier called Putty and you should be sitting on the following screen which is the start page.
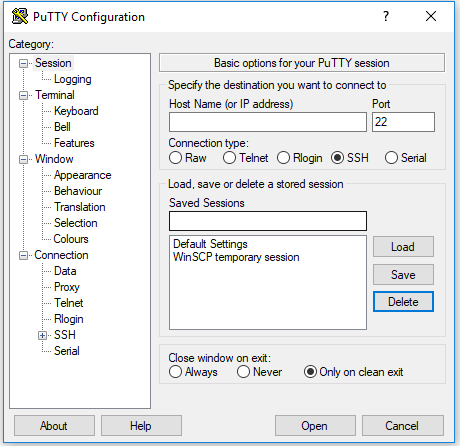
Looks a little sketchy and old school huh? I love it ^_^
Okay, so if we swap back to our DigitalOcean dashboard we can find the ip address of our new server, it will be a number like this: 167.99.163.146. I know you may be thinking “but what about my domain name?”, worry not we will get to that point here in a few, for now we will use the ip so you can get accustomed to connecting with it.
- Grab your ip address and paste it into the box on putty for Host Name
- On the left there we need to click the (+) next to SSH and click once on the word auth
- You will need to click browse under private key file text box at the bottom and choose your key you generated above (the .ppk file)
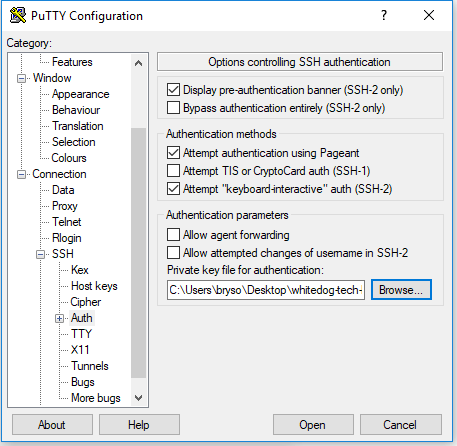
Don’t click open quite just yet
Now we need to click on Session on the left side bar once (you may need to scroll up) and in the Saved Sessions box type a name to help you remember which server this is and then click save on the right. Now when you open putty in the future you can just double click into your server from the save list! Click open and you will be greeted with this awesome box.
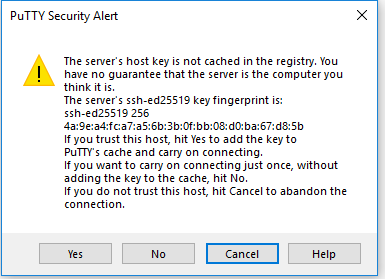
This is checking to make sure you trust this server
At this point when you click Yes, you are stating to your computer that you trust the fingerprint on this server and will no longer ask you about it in the future. You will be presented with the following screen which may start to scare most non-computer folks, but you just need to take a breath and enter your super secret passphrase here. Be advised here (you may have tried and already don’t know what’s going on) in the linux terminal you won’t see your password being entered. While you type it is indeed being entered in, just type your passphrase and hit enter and be greeted by the ubuntu welcome screen.
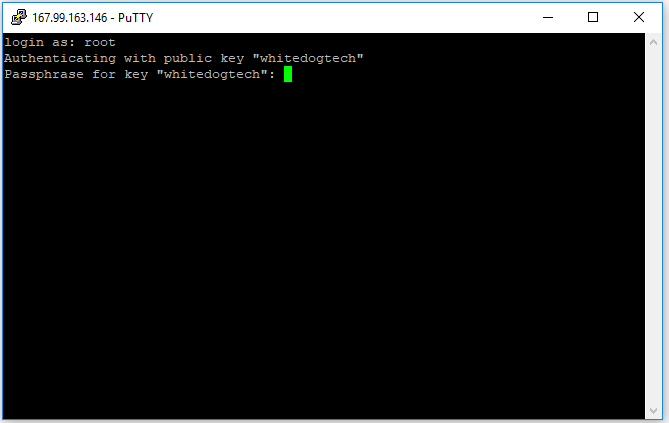
Ubuntu ssh login
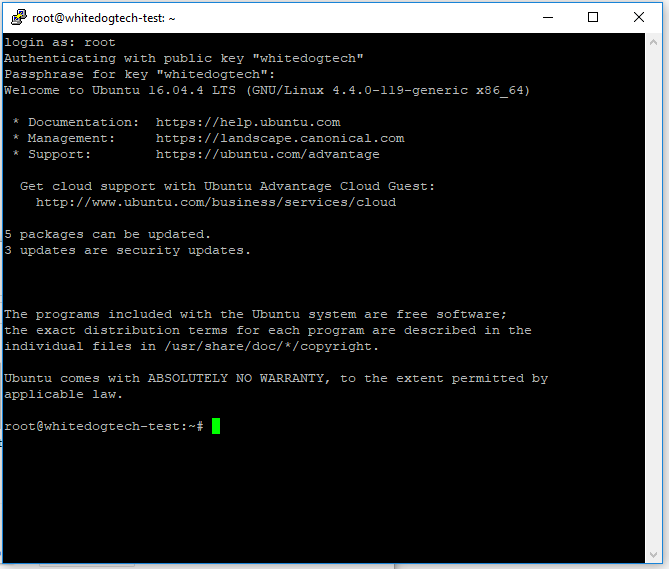
The awesome Ubuntu server welcome screen
A small note to non-linux users at this point, you will see from the above image this line root@whitedogtech-test:~# . I’m sure yours will differ depending on your hostname you entered earlier. This is basically a info string for you to recognize a few things about this terminal. We will break this down quick so you won’t be confused later on.
root– this is the currently logged in user@whitedogtech-test:– this will show either your hostname or the description you entered when creating the droplet~– this is your current path or directory, though the~generally is a stand in for your home directory and you will see it a lot vs./home/{yourusername}/#– this shows that you are under a root command prompt currently, when we make our user you will see$more often
So right off the bat we see somethings here that need to be fixed and that would be we have some updates to install and we are running as root which is usually a no no. You may be thinking then why am in using root? Well the answer is the install used root and setup your user as root. Think of root being the grand overlord of the whole server and while it’s cool that it has all the power, we just want our user to only have this power when needed. So we’re going to run updates before we continue on and this is going to be a command you will be using alot.
Standard Commands:
apt-get update– update our package listsapt-get dist-upgrade– upgrade all packages to their newest versionsapt-get install– we use this command when we install packages from the package manager
You can combine them into one command with the “&&” go ahead and run this and you will see the following output, go ahead and press the “y” key on your keyboard and hit enter to let it install and update. Case doesn’t matter here Y = y.
-
apt-get update && apt-get dist-upgrade

Click “y” and hit enter to continue
Awesome, we now are updated and are ready to get our limited user setup before we accidentally do something bad. To get started we’re going to run a few commands and get our user setup, while entering your password remember you won’t see it being entered but it indeed is.
adduser bryson– create our new user- You can enter details for the user or leave them blank, that entirely up to you
usermod -aG sudo bryson– add our user to the sudo group
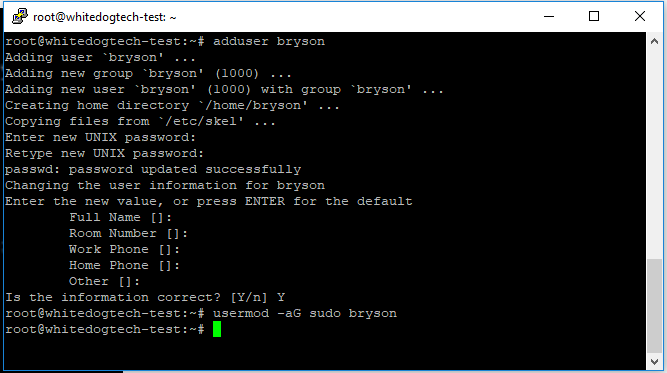
Adding a user is pretty easy
Now what we did here is added a user, in my case named bryson, and then we added our user to the sudo group with the second command. The group sudo is that “grand overlord” i mentioned, now that were part of that group when our user needs to escalate permissions we can execute the sudo command and get those privileges. But before we do that we need to finish our users key setup. What we’re going to do next is access the user through the root account and “login” as the user. Fire off the following command and you should be logged in as your user, verify with the following image.
su - bryson
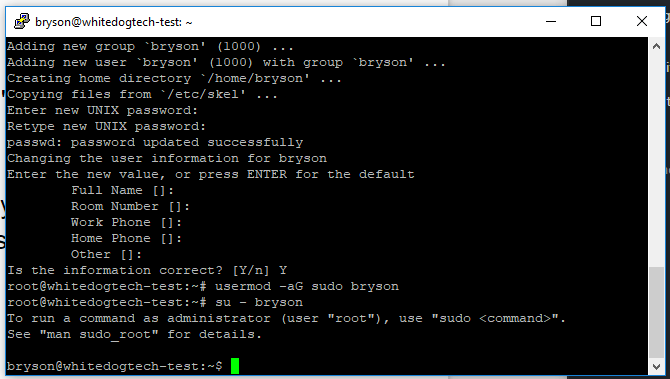
Logging in as our newly created user
If you look at the terminal now you can see that the username has changed from root to bryson and we can now go ahead and setup ssh-key access for our user and lock down our server a bit more. Next were going to fire off the following commands, these will make the files and get our key setup to login with.
cd– This will make sure we’re in our home directorymkdir .sshchmod 700 .sshnano .ssh/authorized_keys- You will need to paste that public key we saved earlier into this file (remember right click on the window)
- Save the file – Press Ctrl + O
- Press Enter to save the file
- Exit from nano – Ctrl + X
chmod 600 .ssh/authorized_keys
Now thats it, our user is setup to use our key to authenticate when we connect to the server. We can test this by opening a new putty window and connecting with our user when logging in. If all goes well you can continue on from your user with the next commands, if something seems admis here then it’s pretty easy to backtrack and see what has happened. Make sure to double check the public key you entered and ensure you copied it from start to finish. Now we can go ahead and lock the server to make sure we don’t allow people with just passwords to access our server. This is pretty simple to do and were going to need to edit a system file here but don’t worry I have faith you can get through this with no issues.
Fire off the following command and open up the settings for the ssh server and were going to look for a few lines here.
sudo nano /etc/ssh/sshd_config– this will open the file in the editor, notice thesudohere- Enter your password here you created when making your user
- Note: Ctrl + W is a life saver here and you can use to search in big files, press it and copy in the following lines to find them fast
- Port 22 – This line you can change now if you want a non standard port, though when doing that use caution to not use a used port. ( Huge list on wikipedia: https://en.wikipedia.org/wiki/List_of_TCP_and_UDP_port_numbers)
PasswordAuthentication yesand make sure this setting is set to noPasswordAuthentication no- Save the file – Ctrl + O
- Close the file – Ctrl + X
- Reboot the server –
sudo shutdown -r now
Now we have setup the server to not allow password based logins when users connect to this server and also must use a keyfile in order to gain access. We then went ahead and rebooted the server just for good measure and should now be able to login with our private key and passphrase and then use the password when issuing commands from our logged in user.
Woah, time for a short break … Okay well we did some stuff and are ready to really dig into our web server install. This is going to take a bit so you might want to grab a sandwich and a drink to get through this bit. After this section we should have a fully working web server and should be ready to serve our files to the masses.
{Web Server Setup}
We’re going to go ahead and start by installing nginx [engine x], which is a web server software among other things and you can read more on their page located here. We’re going to take this a bit further and build this from source which will allow us to make a few changes along the way. Now i know some of this will be above the average non-techie’s head but if you need more information on what your doing you can look up the commands we are using in google and find a ton of information in ways i couldn’t even begin to explain. These are some of the most recommended configurations that are pretty standard from what I have seen while doing my own research, if you believe something should be edited, hit that comment box and drop me a message to say why.
{Nginx}
At the time of the writing of this it is currently version for the stable branch of nginx is 1.12.2
Start by installing a few things we will need to install and build our code
sudo apt-get install build-essential git zlib1g-dev libpcre3 libpcre3-dev libbz2-dev libssl-dev tar unzip curl
This will install a ton of the necessary libraries and packages needed to build our code and ensure it is working as expected. When asked to install you can choose “Y” safely and allow it to install and finish up. This can take a couple minutes but stand by and allow it to finish. Now that that is finished up we can move onto getting our source code for nginx and start getting it compiled and installed.
cd /tmp– this will move us to our tmp directory. this is a temporary directory we can use to work on our codewget http://nginx.org/download/nginx-1.14.0.tar.gz– This will download the actual code to our workspacetar -xzvf nginx-1.14.0.tar.gz– this will unzip the files in this specified archive filecd nginx-1.14.0– this will move us into the folder where the code is located
Now we should be ready to get nginx compiled, if you would like to customize the public information for nginx we can do so now before we finish compiling files. The reason for this is purely information from the standpoint that anyone who queries your server about its version will show the changes here rather than the standard ‘Server : nginx 1.12.2’. If you don’t care about this you can go ahead and skip over this step and continue on without any worries. While these may look very long, it’s a pretty simple find and replace which will save you from having to sort through the config file to find the values. Just copy and paste into the terminal to run these, you may think the command didn’t work due to it just showing a blank line but i can assure the edits did happen.
src/http/ngx_http_header_filter_module.c– This is where the file is located relative to where we are now, you do not need to edit this unless you would like to enter the two following edits manuallysed -i 's/static char ngx_http_server_string\[] = \"Server: nginx\"/static char ngx_http_server_string[] = \"Server: WhiteDog Technology\"/' src/http/ngx_http_header_filter_module.csed -i 's/static char ngx_http_server_full_string\[] = \"Server: \" NGINX_VER/static char ngx_http_server_full_string[] = \"Server: WhiteDog Tech: DogServer v1\"/' src/http/ngx_http_header_filter_module.c

You can see it seems like it just took the command and said ok, next?
And now we are on to the most important part of the nginx install, the configuration. With this part we will be telling nginx through its config file how we want it to act and what modules we want to build with. The following code is one long line you can paste over to get this setup. Though you should take a moment to read over what each module does and ensure you have the needed functionality you require. You can find more information on the following website. We will paste the following into our console window and watch the magic happen.
Note: when pasting commands with a ending \, this will create a new line for the console to read and stops it from issuing the command when you just paste it in as you may have now noticed, just hit enter once it’s in the console and it should go along smoothly.
./configure --user=www-data \
--group=www-data \
--prefix=/usr/local/nginx \
--sbin-path=/usr/sbin/nginx \
--conf-path=/etc/nginx/nginx.conf \
--pid-path=/run/nginx.pid \
--lock-path=/run/subsys/nginx \
--error-log-path=/var/log/nginx/error.log \
--http-log-path=/var/log/nginx/access.log \
--with-http_ssl_module \
--with-http_realip_module \
--with-http_stub_status_module \
--with-http_sub_module \
--with-http_gzip_static_module \
--with-http_secure_link_module \
--with-file-aio \
--with-threads \
--with-http_v2_module \
--with-stream \
--with-stream_ssl_module \
--with-debug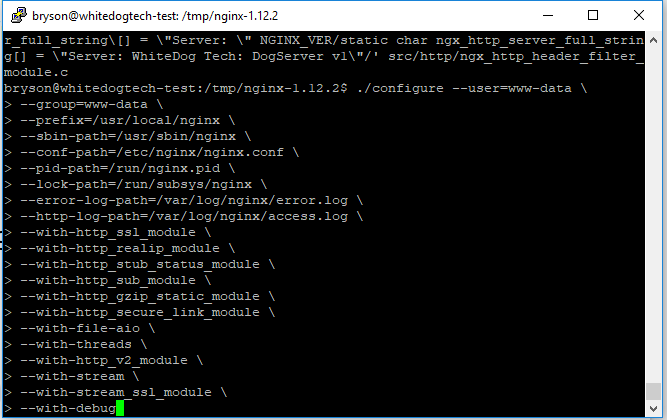
Nginx configuration options entered and ready n the console, just needing to hit enter and watch the magic happen
You should see something like the following once finished and we should be ready to make and install our application.
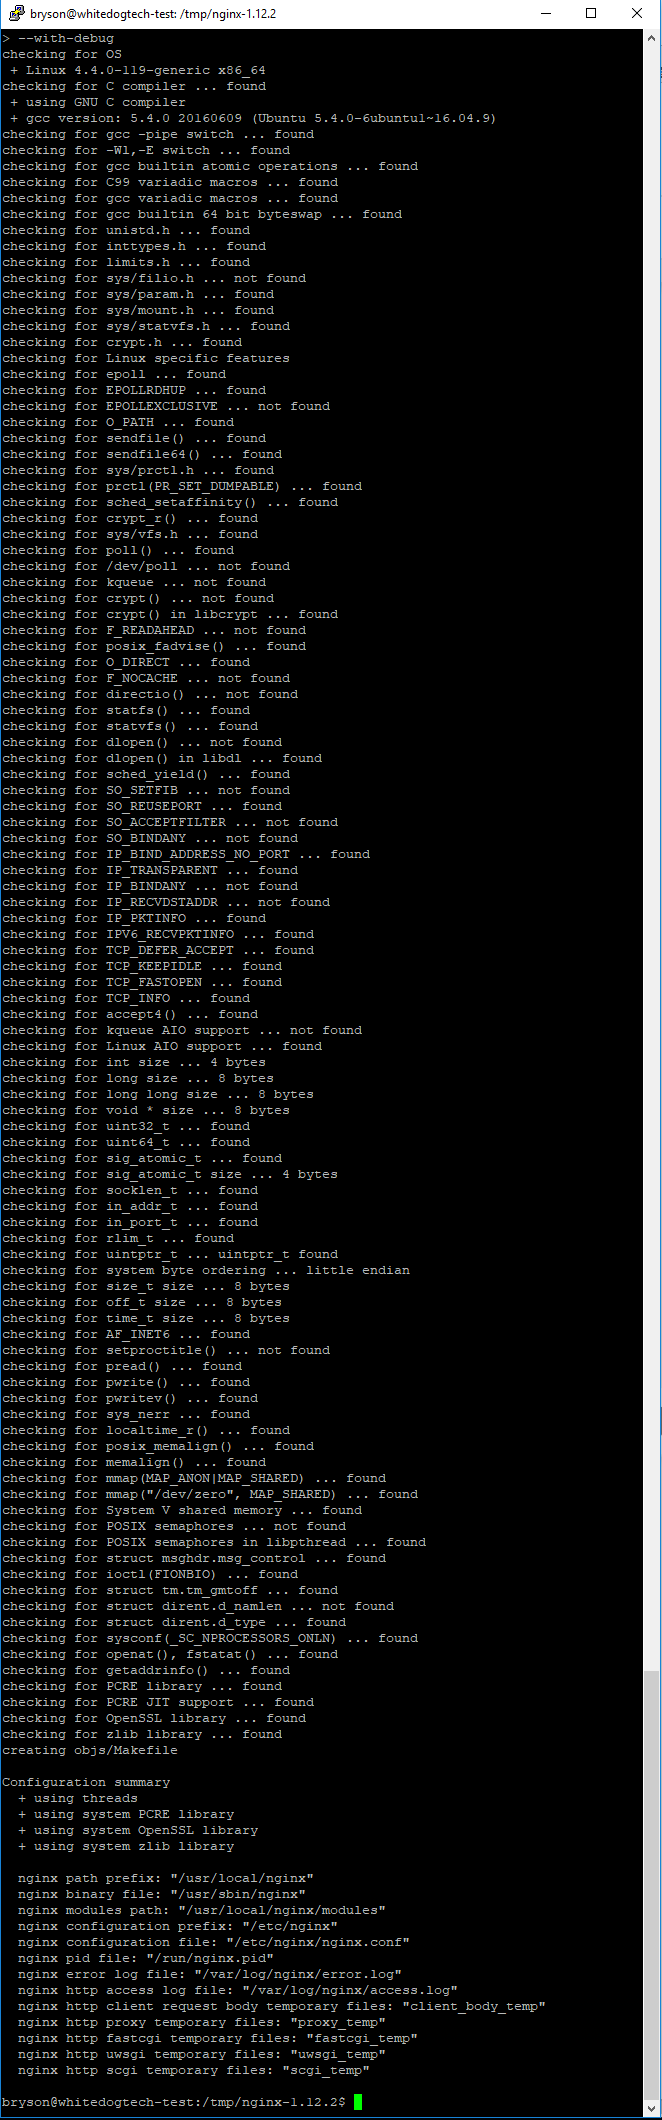
Output after running the configuration command, this is a lot of information we don’t need to worry about now pending we don’t have an error.
And now onto the actual build and install, we are going to run two commands but these may take a few minutes to run depending on the machine you have setup. If it’s taking a while, just hang in there and let it finish up. After this step we will move forward fast with the other software installs.
make– This command will compile the actual configuration file we just set up alongside the code for nginx, this part will usually take a few minutes
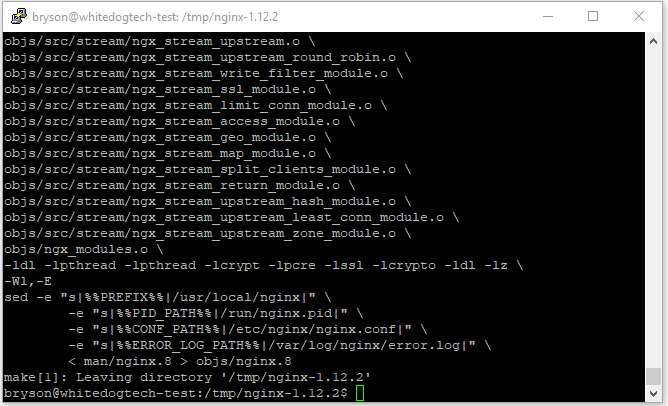
If all goes well you should see the following output from the console
sudo make install– Once we have no errors from the make command we can run this to finish the install to our system
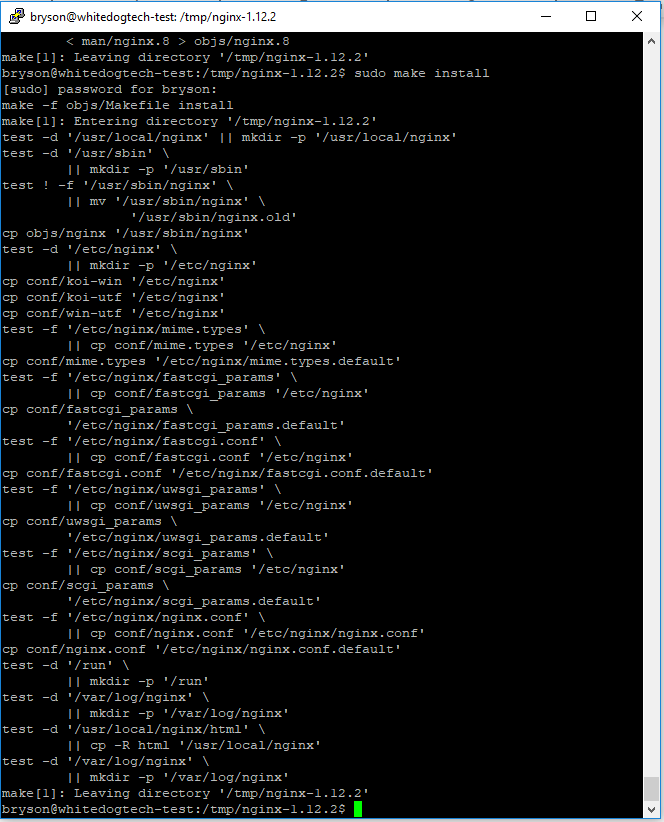
And our nginx is setup and installed!
Now that we have nginx setup and installed, you may be wondering how we can control this software. At times we will need to stop, start, and reset our server. Each time we need to do this we dont what to have to restart our entire server just to do that now would we? Exactly, no. So we are going to nab a script from github to make our life easier when it comes to controlling the nginx server.
wget https://raw.githubusercontent.com/whitedogtech/nginx-init-script/master/init -O ~/nginx-init -q &> /dev/null– this will download the script i mentioned from my public github repo and save it in your home folder- Note: if you noticed the
-O ~/nginx-init -q &> /dev/null, nice job. This basically renames the file as it downloads and also hides the output from view, while not required, very helpful sometimes sudo mv ~/nginx-init /etc/init.d/nginx– We will move the script from our home directory to the required place for control scriptssudo chmod +x /etc/init.d/nginx– We give the script the ability to execute the code inside itselfsudo /usr/sbin/update-rc.d -f nginx defaults– We update the System V init scripts (basically add our commands from the script to the system so it knows what we can and can’t run for commands on this script more info)
Congratulations, You have successfully downloaded, configured, compiled and installed nginx from source! You should feel proud doing this as most people would grab the first version in the repos via the apt-get install command and never know how easy it is to build from source. We can finally test our nginx install by starting the server and then visiting our ip address in a browser window to see our handy work.
sudo systemctl start nginx– this will start our nginx server, you can use start, stop, restart, and status here for alternatives
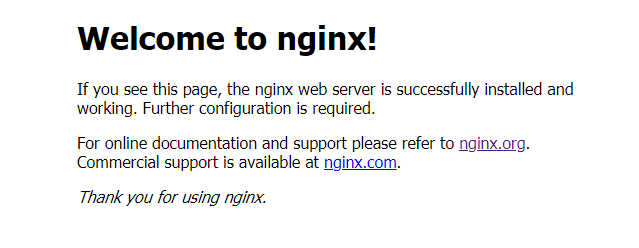
When visiting our ip address in the browser, we see this message letting us know nginx was installed and is running on our server
{Install PHP, MySQL, and Let’s Encrypt}
Next up on our list of installs is the rest of out web server, including MySql, PHP and certbot for Let’s Encrypt to be able to generate our ssl certificates. To install MySql and PHP we will use the apt-get tool to gather and install our packages. The following command will download and install the mysql-server package, followed by the php-fpm package , and finally end on installing the php-mysql module.
sudo apt-get install mysql-server php-fpm php-mysql
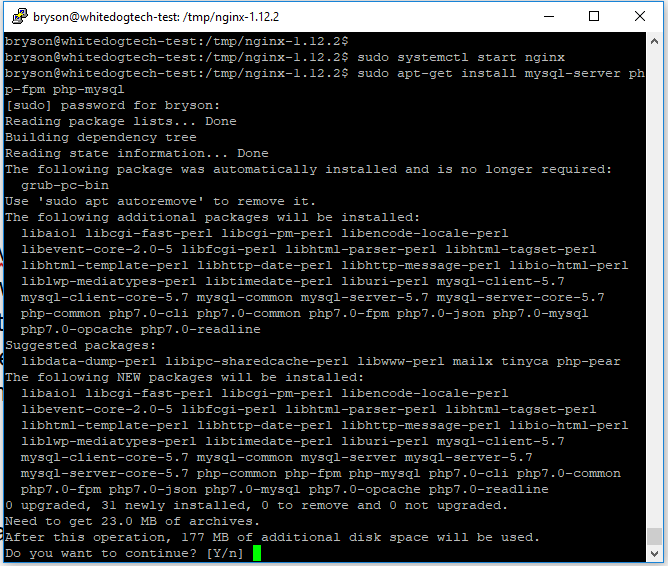
We can see there is a fair bit of setup to do, but ubuntu will take care of all of this for us thanks to the apt-get manager
You will be asked a few questions as you run this command that you need to answer, but they’re pretty straight forward just ensure you write down any passwords you setup as this will be your root database password. Once finished were going to go ahead and run our mysql secure tool provided by the mysql-server package to ensure our server is ready to be used and we remove the test related stuff.
Edit: This step can be skipped on ubuntu 18.04+ as you need to change the admin password from within the database, see the mysql section below for more information.
sudo mysql_secure_installation
This will ask us a few question starting with the password we setup previously. For these question we will want to answer like so:
- VALIDATE PASSWORD PLUGIN can be used to test passwords and improve security. It checks the strength of password and allows the users to set only those passwords which are secure enough. Would you like to setup VALIDATE PASSWORD plugin?
- This would be if you want to enforce password restriction on the database server, we will go with no for now but this option can be changed in the future by revisiting this script. If you choose yes, your passwords will require a minimum amount of characters to be valid eg. instead of “GreenDog” we would need something more like “GreenD0G1!”
- Change password for root? No
- Remove Anonymous users? Yes
- Disallow root login remotely? Yes
- Remove test database and access to it? Yes
- Reload privilege tables now? Yes
Now that should finish up the mysql install and we’re ready to continue on to our Let’s Encrypt setup. This is going to be super short and sweet, with only three commands to be fired off to get this working.
cd /usr/local/sbinsudo wget https://dl.eff.org/certbot-autosudo chmod a+x /usr/local/sbin/certbot-auto
Finished, Boom. Now take a break and pat yourself on the back as we have our software all installed!
{Domain Configuration}
Now i told you we would be setting up our domain here soon right? Well this topic is hugely different based on the registar you use, here is a link to a great tutorial to get you started with the most common ones. This should be pretty simple and once done we can jump back to our tutorial and finish getting our server configured.
{Configure Nginx, PHP, and MySQL}
Now that we have all our software installed for a minimal web server, our next goal is to get our hands a bit dirty and configure everything to work together. Mainly this section will be about the configuration of nginx and php but we will throw in a bit of mysql to get you up to speed and be able to host your site that requires a database backend. Once we have that all finished up we will make sure our site is working and then grab a certificate and get that installed as well so our site will be running and secure at the same time. While we will only setup a test database you will be able to use the same instructions for any database setup. I will also introduce my favorite windows mysql editor that allows us to manage our mysql server without packing on a ton more software on the server. This will save us some hair pulling as well as a bit of security on our server in the long run.
{PHP Configuration}
For php it’s pretty straightforward, we just need to set up our php file for nginx to load to communicate with our php installation. Now most tutorials will say to set this setting “cgi.fix_pathinfo=0;” to 1, but this is NOT needed anymore unless you plan to run some very old php code. You can read more on this here if you are looking for more information. Beside that, the configuration for php is pretty easy
sudo nano /etc/nginx/fastcgi-php.conf- paste in the following snippet, this will tell nginx how to communicate with our php install
location ~ \.php$ {
include fastcgi_params;
fastcgi_intercept_errors on;
fastcgi_pass unix:/run/php/php7.0-fpm.sock;
fastcgi_param SCRIPT_FILENAME $document_root/$fastcgi_script_name;
}
Now we can Save and Close this file and move onto the nginx configuration which will take a bit more work.
{Nginx Configuration}
To get started here were going to create a few folders we will need in the next steps. After that we will generate a “Diffie–Hellman” key to be used with our server and finally move onto the configuration file for nginx itself.
sudo mkdir /etc/nginx/sites-available– this is where our available configuration files will be kept, these may or may not be enabledsudo mkdir /etc/nginx/sites-enabled– this is where our enabled files will live, these will be linked from our available files (a symlink is what it is called)sudo mkdir /etc/nginx/ssl– our DH key will live in this folder and be used when needed by nginx
That DH Key takes forever to make most times due to the bits we used… Like i said go stretch your legs for a few
sudo openssl dhparam -out /etc/nginx/ssl/dhparam.pem 4096– this command will generate the DH key, it will take a while so make sure you stretch your legs, feed the dog, maybe take a nap while it’s runningsudo chmod 664 /etc/nginx/ssl/dhparam.pem– this will set the permissions on the key file to be able to be read by nginx
Well that about covers the basics, now we can get the configuration file for the nginx server set up and ready to serve our pages. We will now dive into our actual nginx.conf that will configure our server. Now rather than make you copy this all in and go through hell in trying to get it copied correctly, we’ll just use our friend here Mr. wget. Now i have hosted the config files up on github and we’ll pull these to our system and replace the current files and finally make our edits.
wget https://github.com/whitedogtech/nginx-init-script/raw/master/example.com.conf -O ~/example.com.conf -q &> /dev/null– this will download the sample virtual hosts file we will edit in a minutewget https://github.com/whitedogtech/nginx-init-script/raw/master/nginx.conf -O ~/nginx.conf -q &> /dev/null– this file we will use to replace our existing file, this will help us have a more robust systemsudo mv ~/nginx.conf /etc/nginx/sudo mv ~/example.com.conf /etc/nginx/sites-available/
Now we can dive into our domain configuration file, also or more commonly known as a virtual hosts file. This is setup with the intent of being enabled and allowing nginx to serve content on that domain or domains and also setup the ssl certificates for that host as well. There should be a few edits to get this site up and running with your domain, the following are the edits you will need to make to enable this host file for your domain and finish up the nginx configuration.
sudo mv /etc/nginx/sites-available/example.com.conf /etc/nginx/sites-available/example.com.confsudo nano /etc/nginx/sites-available/example.com.confserver_name example.com www.example.com;– This is in the first server block at the top of the file, for now you will need to edit this part to your main domain, both the “example.com” and “www.example.com” should be there if you set them up previously to direct at our ip address.server_name example.com www.example.com;– Again, edit this to your domainroot /srv/example.com/public_html;– This setting tells nginx where to server our files from, edit this setting for now to your domain and we’ll create this in just a moment- Toward the bottom of the file you will find three lines that are commented out for now, these will need to be edited and uncommented so that it will be ready when we get our certificate
- Save and close this file
sudo mkdir -p /srv/example.com/public_html/– This will create the main folder as well as the subfolder to store our files
And that’s about it, not too bad of a setup if I do say so myself. We have our configuration setup and ready to serve our files from the directory we setup. All that you need to do is move your files to this directory and they should be served up. For the interim, we will create a simple php file to display the php debug information.
sudo nano /srv/example.com/public_html/index.php<?php phpinfo(); ?>
Save and exit the file, we should see the output from this once we obtain our ssl certificate and test everything is working fine.
{Let’s Encrypt}
Now, i know we haven’t quite finished setting up nginx, but we need to obtain a certificate in order to finish our nginx setup. This certificate will help ensure our site and the visitors to our site are securely connected to each other. This process should be quick and easy as we have already set up our dns settings and should now be ready to serve our domain. From time to time you may have to clear your browser’s cache to clear old files if you have been visiting your domain already to “kick-start” the ssl serving correctly to your computer.
sudo systemctl stop nginx– Let’s stop nginx so Let’s Encrypt can communicate to get the certificate without encountering any errors
With the following command you will run it to obtain the certificate for your domains, if you want to make sure it covers both the non-www and www versions we will want to run this command with two switches. If you are using a subdomain you can leave out the second -d switch.
- Make sure you enter them with the non-www version first and upon the first run of this command you may be prompted to install some software packages, this is normal and you can accept the install
- No subdomain:
sudo certbot-auto certonly --standalone -d example.com -d www.example.com - Subdomain:
sudo certbot-auto certonly --standalone -d subdomain.example.com
- No subdomain:
- First you will be asked for an email address to send updates when your certificates are about to expire
- Next you will be asked to accept the terms of services, “A” to agree once read, which is linked from the script ( https://letsencrypt.org/documents/LE-SA-v1.2-November-15-2017.pdf )
- And finally you will be asked if you would like updates from the EFF This one is totally up to you and won’t affect the certificate install
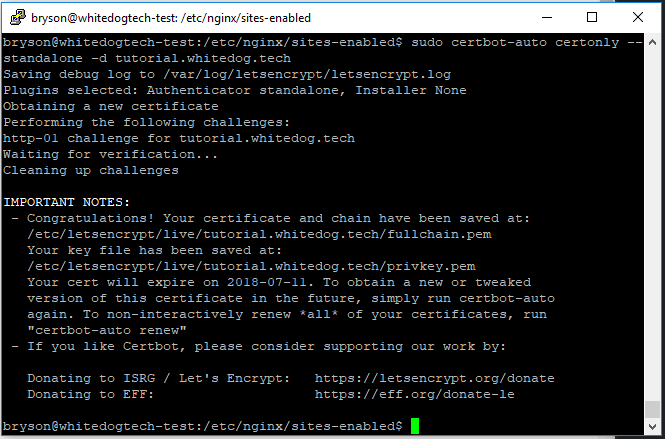
Let’s Encrypt was a success and is now ready to work, take note of the path for the key file
And with that we should have our ssl certificate installed and ready to use with nginx and ensure our sites are all secure. We can check from the “Congratulations” from the script output and a path of where the certificate was actually stored at eg. /etc/letsencrypt/live/tutorial.whitedog.tech/. Now we can finish up the rest of our nginx changes and finally test our site out! If you didn’t uncomment the lines earlier for ssl in our config file, you might want to do that now.
Note: Incase your not sure what a comment is at this point, it is usually a line in a file that stops the file from reading that line. In our case it’s the “#”, which we will need to remove all three from the lines in /etc/nginx/sites-available/example.com.conf
sudo ln -s /etc/nginx/sites-available/example.com.conf /etc/nginx/sites-enabled/– his will link our virtual hosts config file to be ready to use when we load the server back up here in just a secondsudo nginx -t– This command will ensure our config files for nginx are all in order, if this goes good then we can start the server back up. If a error happens here the error will be inside theexample.com.conffilesudo systemctl start nginx– Now if all goes well we should get no output from this command
And now we should have a fully working secure web server, Now really how hard was that to do? From here if your going to only host static sites, you can stop and go about your day. For those that are looking to get your mysql server setup for something, let’s say wordpress you can continue to follow along and we shall setup a new test database ready to use for anything needing a mysql database.
{MySql Database}
Now we have earlier installed and secured our mysql database, and now are ready to create our new database. Now you can use the root login with your databases in general, but this is only recommended for testing locally. Do not skip this part if you want to use some type of application with a database backend. I will show you two ways to accomplish this both manually and with the help of a ssh tunnel via HeidiSql.
Edit: This edit is for Ubuntu 18.04+ as the password needs to be reset via the database
sudo mysql -u root– this will log us into the root user without a passwordALTER USER 'root'@'localhost' IDENTIFIED WITH mysql_native_password BY 'password';– this will set the password for the root user, better write this down!FLUSH PRIVILEGES;– this will make sure the user privileges are updated for the new password
{Manual}
The Manual way is as follows, it’s pretty easy to get setup and can be used for other databases you create as well.
mysql -u root -p– this will log us into the server pending the password is correct, we set this up earlier when installing mysqlmysql>– you should be at the this prompt now, this is where we can run our commands from
Now that we are logged in we’ll go ahead and add our new user on the server. If you are new to mysql here is a great guide to get you up and running quickly with understanding the basics.
Note: Notice how each line ends with a “;“, this terminates the end of the statement, if you forget this you will be prompted with another > rather then the output.
CREATE DATABASE TutorialProjects;CREATE USER 'bryson'@'localhost' IDENTIFIED BY 'White Dog1!';GRANT ALL PRIVILEGES ON TutorialProjects.* TO 'bryson'@'localhost' WITH GRANT OPTION;FLUSH PRIVILEGES;
This will create a user to only access the databases we choose and only locally to the server. What this means is you can only connect to the database from the server itself. This is just a safety measure as we shouldn’t have any scripts or applications running from our root database user nor do we want unauthorized remote database access. This setting will work fine with scripts in the public_html folder as they’re locally stored on the server. This will finish up the basic MySQL install and setup, we are now ready to use our database in our future projects.
{HeidiSQL}
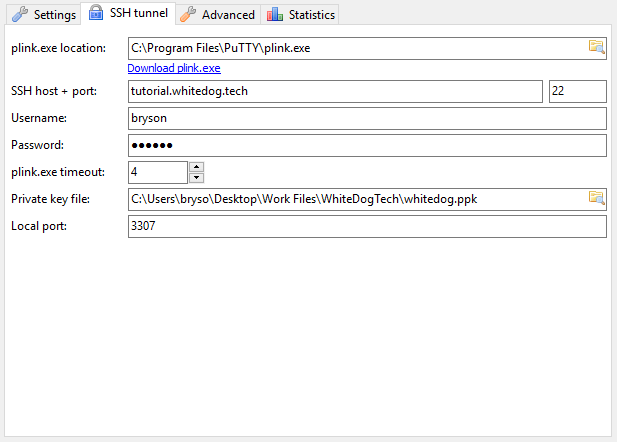
HeidiSQL is a awesome piece of software in my personal opinion. I find it great to make quick edits as well as perform maintenance on sites i manage. You can download it from here and it’s nice and quick to install, once set up we’re half way done. You can also grab the portable version or the installer, the choice is up to you. You will need plink.exe from the putty install, if you grabbed the msi installer you should have this installed on your computer already.
Once installed it’s a pretty simple setup to get connected to our site through a ssh tunnel. What this means is we will be connecting through ssh to the local database user to manage it from your personal computer. Although we will be connected other people will not be able to connect if they aren’t able to connect through ssh, and if you remember we setup keys for this very reason.
- From the left menu, click New
Note: The password here will be your passphrase from your keyfile
The settings we will choose can be found in the below images, if the images don’t work for some reason, i will add a export of the settings file that you can use to import though it will be with the test settings used here.
This is the main screen after you click new, these are the settings i’m using, adjust to your own values as needed
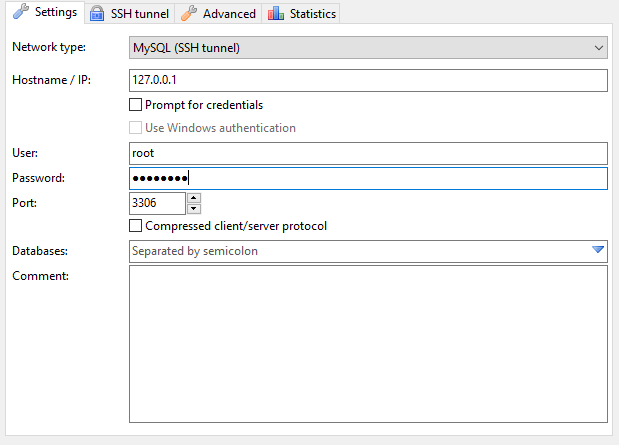
This is the settings for the local sql server when we connect as our user

Heidi screen while connected to a server
Most used icons, add a user and refresh the current server
And that about wraps up Heidi in a nutshell, you should be able to connect and do server management from the gui here without needing the additional software installed on the server. From here you can now add an application to the server that requires a database backend or use it for other uses as you need it. If you have made it this far you should have a fully setup ubuntu based web server running the latest nginx and secured by the ssl certificate we obtained a bit ago. Give yourself a pat on the back, you have made it farther than most people do and now know how to setup and do the basic management of your new server.
{Where To Go From Here}
From here the possibilities are endless depending on what you would like to do. You have a fully setup and secured web server running in the cloud backed by a security certificate which will keep your users data secured while in transit. If you want to run static html files, a WordPress blog, or even a python application your set up to go with just a few minor changes.
If you liked this tutorial and made it all the way to this point, hit that comment box below and leave us a note on how we did, any changes you would like to see, or just a general comment we would love to hear from you!
Trackbacks/Pingbacks